Showing posts with label Mothers Day. Show all posts

Sunday, May 10, 2009

Moederdag/ Mother's Day

Ik wens alle moeders een geweldig fijne moederdag. Hierbij maak ik de winnaar bekend van mijn blog candy. De libelle stempel gaat naar:

cheryl/momzilajn

I wish all mothers a very happy and great Mother's Day. And here is the winner of the blog candy. The dragonfly stamp goes to:

cheryl/momzilajn

(Cheryl please send me a private email with your snail mail address)


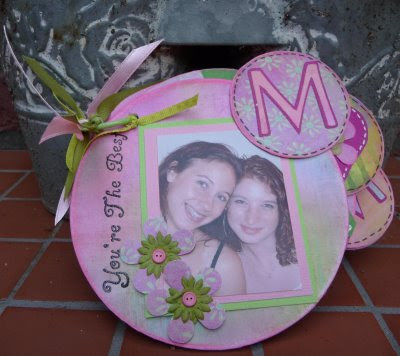
Hier de foto's van het boekje van bierviltjes. Klik op de foto's en je kan het groot en goed zien.

Here the picture's of the coaster booklet. Click on the pictures and you see it larger and more detailed.

Saturday, May 9, 2009

Boekje voor Mama/ Bragbook for Mom

Een vlug boekje nog voor Mama. Je maakt het van een paar bierviltjes en wat cirkels uit een verpakking (ik heb de chocopops doos gebruikt). Verder heb je wat scrap papiertjes, lijm, ponsjes, stickers of je cricut, inkt, splitpennetjes, lintjes.......ach gewoon wat je zoal hebt rondliggen en natuurlijk foto's! Ik gebruik hiervoor het programma Picasa. Dit kun je gratis downloaden en hiermee kun je ook foto's op credit card formaat afdrukken en dat is geweldig voor kleine boekjes. Beplak je viltjes met papier aan beide kanten en ga er met een schuurpapiertje langs, dan die je er wat stempelinkt langs voor een mooie afgewerke rand.
Ik heb dit boekje met 3 viltjes gemaakt en dan neem je 6 cirkels uit een kartonnen doos. Die kleine cirkels beplak je aan één kant. Dit worden een soort tabjes. Versier het geheel naar keuze. en. Gebruik gewoon je fantasie en maak er wat moois van!

A quick booklet for Mom. You make it out of coasters and some circles you cut out of a cerial box (I used my choco pops!). Also you need some scrap paper, glue, flowers, brads, ribbons......... well, things you have lying around and of course pictures! I use this wonderful program called Picasa. It is a free download and it prints credit card size pictures. Great for projects like this.
I used 3 coasters and 6 circles from the cerial box. Glue paper to both sides of the coasters and only to one side of the little circles. Cut them to size and use some sandpaper on de sides. Now take a little inkpad and add some ink on the sides. Now you can decorate everything as you like it. Tomorrow Iwill show my finished project. Have fun makeing yours using your imagination!

Thursday, May 7, 2009

Cadeau tasje/ Purse for wrapping

Blog Candy
Als je deze libelle stempel van Michael Strong leuk vindt en er graag mee zou willen stempelen, laat dan voor moederdag een berichtje achter. Je maakt zo kans om de stempel te winnen!

If you like the dragonfly stamp by Michael Strong and would like to be able to stamp with it, please leave a comment befor Mother's Day. This way you can win the stamp.
Als je dan zo'n leuk armbandje voor je moeder hebt gemaakt, moet je het natuurlijk wel leuk inpakken. Hiervoor heb ik een tasje gevonden. Het patroon hier is een klein tasje, maar heb je iets groters voor je moeder, dan ga je hier: http://www.carlosnmolina.com/.
Daar vind je een grotere maat tas en een hele video presentatie hoe je het in elkaar moet zetten.


After you have made the cute button bracelet, you want something to wrap it in. How about this purse? Here is a template for a small size purse, but if you have something bigger for your mom, go here: http://www.carlosnmolina.com/. There is also a great video tutorial on how to assemble the purse.

Wednesday, May 6, 2009

Jurk voor Mama/ Dress for Mom

Een leuk kaartje met een jurk voor mama, schattig toch?! Ik kreeg dit idee van een vriendin. De jurk is gemaakt met een nestibillity scalloped circle en een pons van Stampin'Up!. Maar het kan zijn dat je die niet hebt en daarom heb ik er een patroontje van gemaakt dat je gewoon op papier kan leggen en uit kan knippen. Wat glittersteentjes en lintjes maken het geheel af.
A dress card for mom, isn't it cute? I got this idea from a friend. I used my scalloped circle nestibillitiy for this and a SU! punch. But I guess you do not all have this, so I made you a template that you can trace on a piece of scrap paper. Some gemstones and ribbons will finish your card.

Monday, May 4, 2009

Boekenlegger/ Bookmark

Ik heb toch zoiets leuks op internet gevonden. Een ander soort boekenlegger. Een hoek-boekenlegger.
Leuk om te geven bij een boek! Je hebt een vierkant van 8x8 cm nodig en wat restjes papier.
Kijk hier maar eens, daar zie je precies hoe het moet en nog wat meer voorbeelden:
http://www.barbstamps.com/my_weblog/2009/04/super-cool-bookmark.html
Als je hem van andere kleuren maakt, is 'ie straks ook geschikt voor vaderdag.

I found something real cute on the internet: a corner bookmark. Isn't this nice to give with a book? You just niet a square piece of paper 3x3 inch and some scraps. Here you can see how to make this and some extra samples: http://www.barbstamps.com/my_weblog/2009/04/super-cool-bookmark.html.
When you make it in different colors, it is also great for Father's Day.

Monday, April 27, 2009

Post-it sleutelhanger/ Post-it keychain

Altijd een notitieblaadje bij de hand met deze sleutelhanger met post-it blaadjes. Leuk voor Papa en Mama (maar ook voor jezelf!!).
Dit heb je nodig:
een stevig papier van 10,5 x 5 cm
een aantal post-it blaadjes 5x5 cm
een boekring
versiering (stickers of foam decoratie)
lintjes
schaar en lijm
gaatjestang
It is always great to have some note paper at hand. This is a cute present for Mom or Dad (but also for yourself). This is what you need:
a piece of cardstock 2"x 4 1/8"
some post-it paper 2"x 2"
a bookinding ring
some decorations (stickers or foam)
ribbons
sciccors and glue
crop-a-dile (to make a hole)


1. Neem eerst het papier en ril het bij 5 cm en bij 5,5 cm en vouw het netjes dubbel. Neem het post-it papier en plak het aan een kant in het mini-boekje vast. Neem nu je gaatjes tang en maak door en door een gaatje in de hoek.
1. Take the cardstock and score at 2" and 2 1/8"and fold double. Take the post it paper and glue it inside the mini-booklet. Take your crop-a-dile and make a hole in the corner.
2. Nu kun je het boekje versieren zoals jij dat leuk vind. Tot slot haal je de boekring door het gaatje en voor Mama kun je hem dan nog versieren met wat lintjes.
2. Now it is time to decorate the front to your own desire. When finished take the ring trough the hole and for Mom decorate it with some ribbons.


3. De sleutelhanger staat leuk aan een handtas of schooltas.
3. The keyring looks great on a handbag or schoolbag.

post-it blaadjes houder/post-it note holder

Dit is een leuk en snel project om te maken en wat notitieblaadjes naast telefoon of computer zijn altijd handig. Dit heb je nodig:
schaar
lijm
een onderzetter (uit een bar of café, mag ook best een ronde zijn)
een papierklem
stukje scrappapier
wat post it blaadjes
een lintje
schuurblokje of papier
een bijpassend inktkussentje. This is a cute and fast project. One cannot have enough note paper near the telephone or the computer. This is wat you need:
scissors
glue
a coaster (from bar or pub, can be a circle too)
bookclip
some scrap paper
some post-it papers
ribbon
sandpaper or block
matching inkpad

1. Plak het scrappapiertje op de onderzetter en knip het met de schaar op maat, mooie ronde hoeken en dan ga je met een schuurpapiertje of een blokje langs alle kanten.

1. Glue the scrap paper on the coaster an cut the paper to fit the coaster. Make nice round corners. Take your sandpaper or block and sand all sides.

2. Het reepje papier knip je op maat van de papierklem en plak je er met dubblezijdig tape op.
Dit kun je aan de voor en achterkant doen. Met het inktkussentje ga je langs alle kanten van de onderzetter.
2. Cut the paperstip to fit the bookclip. Use some double sided tape. Take your inkpad and use it on all sides of the coaster.
3. Maak het geheel nu af met de post-it blaadjes en de papierklem op de onderzetter. Ter versiering kun je aan de klem nog een lintje knopen.
3. Finish the project with adding the post-it notes and the bookclip to the coaster. Add a piece of ribbon for decoration.

Thursday, April 23, 2009

visitekaartjesbakje/ business card holder

Vandaag een idee dat voor zowel Vader- als Moederdaggebruikt kan worden. Het is een bakje voor visitekaartjes. Leuk om bij de computer te zetten (thuis of op het werk).

Dit heb je nodig voor 1 bakje: 11 lolliestokjes, lijm, schaar, plastic of vetvrij papier om op te werken. Als extra heb je iets nodig om de voorkant te versieren. Ik heb het hier gedaan met woodsies (kleine houtjes), die je gewoon met kleurpotlood kunt kleuren. Je kunt ook foam figuurtjes gebruiken als een bloem, ster of hartje.

Hoe ga je te werk: Leg de lolliestokjes op het plastic of vetvrije papier. Hieronder zie je hoe je de stokjes aan elkaar moet lijmen. 2 Stokjes voor de onderkant, 3 stokjes voor de voorkant, en 4 voor de achterkant. Voor de zijkanten knip je van de laatste 2 stokjes 3,5 cm van de boven en onderkant af en ook die plak je twee aan twee aan elkaar.

Versier nu de voorkant van het bakje naar eigen keuze. Tot slot gaan we het geheel in elkaar zetten. Lijm de bodem aan de achterkant en de twee zijkanten vervolgens aan de bodem en de achterkant. Nu kan je de voorkant er tegenaan zetten. Laat het geheel goed drogen.


Today an idea for either Mothers' Day of Fathers' Day. It is a holder for business cards. It can stay near the computer at home or on the workplace.


What do you need: 11 popsicle sticks, glue, scissors and plastic or wax paper to protect the work surface. For decoration I used some woodsies here, they are easy to color with color pencils, but you can also use foam forms like starts, hearts or flowers.

This is what you do: have the popsicle stics on the plastic or the waxpaper and glue them together like you see above. 2 For the bottom, 3 for the front and 4 as the backside. Now for the sides you have to cut the last to stick on top and bottom for 1 1/4" and also glue them two by two.

Start decorating the fron side of the holder. When everything has dried, glue the holder together. Start with gluing the bottom to the backside and than the left and the ride side. Finish with the front of the holder. Let all dry well.

Wednesday, April 22, 2009

Mok voor Mama/ Mug for Mom

Een aardigheidje voor mama's die van thee (of koffie) houden. Eeen mokkaartje met theezakjes (of oploskoffie zakjes) erin. Het patroon heb ik hier gevonden:
http://www.ruthannzaroff.com/mirkwooddesigns/mugcard.htm
En met een plaatje versierd. Je kunt je kind er ook gewoon op laten tekenen.

A little something for those mothers who like coffee or tea. A mug card with some tea or coffee bags inside. The template I found here:
http://www.ruthannzaroff.com/mirkwooddesigns/mugcard.htm
and added a picture and a saying. You can also let your child draw his/her own picture.


Monday, April 20, 2009

Een bloemetje/ A flower

Voor deze bloem heb je nodig een geprinte versie van onderstaande bloemen, groen papier, stiften (of wasco of kleurpotloden), saté stokjes, een schaar, lijm, plakband en natuurlijk een foto.

For this project you need a printed version of the picture below, green paper, markers (or pencils or crayons), wooden sticks, scissors, glue. tape and of course a photo.
Knip de bloemen uit en kleur de blaadjes. In het midden plak je de foto. Voor de blaadjes aan de steel neem je natuurlijk een stukje groen papier. Vouw dit dubbel en leg het patroontje met de stippellijn tegen de dichtgevouwen kan. Knip het blad uit. Je hebt nu in een keer twee blaadjes. Schrijf er wat leuks voor mama op en lijm het aan het stokje vast. Dan plak je met twee stukjes plakband het stokje aan de bloem en zet hem gezellig in een plantje.

Cut the flower and colour the leaves. Glue the photo in the middle. For the leaves you take a piece of green paper and fold it. Put the pattern of the leave with the dotted line on the folded side and cut it out. You have instantly two leaves. Write something for Mom on the leaves and glue them to the wooden stick. Take two pieces of tape and use it to fasten the flower to the wooden stick. Push the flower into a flowerpot.

Saturday, April 18, 2009

Nog een pop-up/ Another Pop-up

Deze bos bloemen hoef je geen water te geven en vrolijk iedereen op. Leuk voor Mama, maar ook als beterschapskaart. Wat heb je nodig?
1 scrapvel van 30 x 20 cm, een kaart van 15 x 21,5 cm, een schaar , een stift en lijm.
Begin met het scrapvel in stukjes van 10 x 10 cm te snijden (of knippen). Je hebt er 7 nodig.
Vouw het eerste vierkantje twee maal horizontaal als bij 1. en draai het velletje om en vouw het nu twee keer diagonaal. Als je het nu weer omdraait kun je het gemakkelijk invouwen en zie je een kleiner vierkant. Teken met een potlood hierop het hartje en knip de bovenkant eraf. Doe dit 7x.
Vouw de bloem nu open en knip er een deel uit zoals aangegeven bij 4. Neem nu een stift en maak het midden met streepjes een beetje zwart. Ik heb er ook met een witte gelpen nog wat streepjes erop getekend.
Nu gaan we het geheel in elkaar zetten. Plak de bloem bij 4 bij de kruisjes over elkaar. Vouw de bloem nu dubbel als bij 5 en bij de kruisjes doe je een beetje lijm op de bloem. NIET het hele blad insmeren! Neem 2 volgende bloemen en plak die aan de buienkant er op. Nu weer lijm er op en bloem nummer vier weer in het midden leggen, lijm erop en bloem nummer 5 en 6 er aan de zijkant op plakken en tot slot bloem nummer 7 er weer midden op. Het bosje is nu klaar om in de kaart te plakken. Vouw de kaart eerst dubbel. Klein beetje lijm alleen op het middelste blad van de bovenste bloem. Plak vast aan de ene kant van de kaart, nu lijm aan de andere kant op het bovenste blad van de bloem en plak de andere kant vast. Nu kun je hem open maken en de bos bloemen popped naar boven!

This bunch of flowers doesn't need any wother. It is nice for Mom or as a get well card. What do you need? one piece of scrap paper 12x12", 1 piece of cardstock 6x 8 1/2 ", scissors, glue and a marker.
Start with cutting the scrappaper in squares of 4 x 4". You need seven. For the flowers we start folding a paper 2 times horizontal as you see at the 1st picture. Turn your paper and fold 2 times diagonal. Turn your paper again and now you can easily tuck the corners inside to get the smaller square. Draw the heartshape and cut the top of. Fold te flower open and cut one leave out as you see in the 4th picture. Take your marker and make the inside lines. I also added some white lines with a gelpen.
To assemble the flower add a little glue on the squares and glue the leaves on top of each other and fold flower in half. Add a little glue on top of the leaves as seen in 5. DO NOT put glue all over the leaves, for than the bunch of flowers will not pop. Add flower 2 and 3 on the left and right side, add glue and add flower 4 on top and flower 5 and 6 on the left and right again. Flower 7 goes on top and the punch is finished.
Take the card and fold in half. Now only a little glue on top of the middle flower on one side. glue this into the card. Close and now open at other side and add again a little glue on top the middle flower only. Close the card and now you can open the card again and the punch will pop up!

Hoedje voor Mama/ Hat for Mom

Leuk kaartje voor Oma, mama: een hoedje. Print het patroon op wit of gekleurd papier en knip het uit. Op de stippellijn vouw je de rand van het hoedje. Je kunt het beplakken met leuke scrappapiertjes of bestempelen. Een bloemetje erop doet het altijd goed.


A hat for Grandma, Mom: print out the hat template and cut it out. Fold the brim of the hat on the dotted line. You can decorate the hat with scrappaper or stamp on it. A flower is a nice finish.

Wednesday, April 15, 2009

Foto kubus/ Photo cube

Een leuke kubus voor Vader of Moederdag. Leuk om samen met je kind te maken. Wat heb je nodig? 6 velletjes origami papier van 15 x 15 cm. 6 foto's (of tekeningetjes) van 7,4 x 7,4 cm en 8 stukjes kaartpapier van 5 x 5 cm en een lijmstift.

This is going to be a wonderful cube for Father or Mothers Day. You can make it together with your child. What do you need? 6 pieces of origami paper 6" x 6". 6 photographs or drawings 2 7/8" x 2 7/8" and 8 little pieces of cardstock 2"x 2". A glue stick comes in handy.

Hierboven zie je het vouwschema (klik op het plaatje om het groter te zien). Hieronder heb ik het nog eens stap voor stap voor gevouwen.

Above you see the folding template (click on the picture to see it larger). Below I have done it step by step.
1. vouw 16 vierkantjes. 1. Fold 16 squares.

2. Draai het papier om en vouw alle hoeken naar het midden en weer terug.
2. Turn the paper and fold all corners to the middle and back.
3. Vouw alle hoeken 1 vakje naar binnen.
3. Fold every corner one square to the inside.
4. Dit is het moeilijkste gedeelte: duw de eerste hoek naar het midden en maak een spreidvouw.
Daarna volgen alle andere hoeken. Een vouwbeen is hierbij handig.
4. This is the hardest part: push the first corner to the middle and make a
spreadfold. Do the same with all other corners. A bonefolder comes in handy
Klaar om alles in elkaar te zetten? De gele blaadjes zijn de foto's of tekeningen en die stop je in het frame dat is ontstaan door het vouwen. Alle kleine papiertjes van 5x5 cm vouw je eenmaal diagonaal.
Ready to assemble everything? The yellow papers are the phot's or drawings. Push them into the folded frames. The little 2 x 2"of paper are folded diagonal.


Aan de zijkant van het frame is een opening waar je deze schakels tussen kunt schuiven. Zet ze vast met een beetje lijm. Je hoeft niet een hele kubus te maken. Je kan ook twee naast elkaar laten. Die kun je leuk op een tafeltje plaatsen. Een tekeningetje met een foto.
To the side of the frame is an opening where you can add the paper as a link to the next frame. Add a little glue. You do not have to make a cube. You can leave it just the two and place it on a table. Just a photo and a drawing.

En zo is het klaar!
The finished project!